使用 Universal Links 和 App Links 进行深度链接
平台:iOS、Android
Universal links (iOS) 和 App Links (Android) 提供了将用户直接带到原生应用内特定内容的能力(通常称为深度链接)。
当用户点击深度链接时,用户会被直接引导到您的应用中,而无需先通过设备的 Web 浏览器或网站路由。如果应用未安装,则用户会被导向网站。如果用户直接导航到网站,他们将停留在网站上。这使得深度链接成为为 Web、iOS 和 Android 构建的跨平台应用的绝佳功能:无缝的移动体验,并优雅地回退到网站。
优势:
- 安全:Universal/App Links 使用 HTTPS URL 链接到您拥有的网站域名,确保没有其他应用可以使用您的链接。
- 无缝体验:一个 URL 同时适用于您的网站和应用,确保用户能够成功访问他们想要的内容而不会出错。
- 提高参与度:链接可以从电子邮件客户端、搜索引擎结果等打开。
演示视频
以下是实际效果。在此示例中,用户已安装原生应用。他们从电子邮件中点击应用链接,直接被带入应用本身。首先,点击根链接 (https://beerswift.app),将用户带到主应用页面。接下来,点击深度链接 (https://beerswift.app/tabs/tab3),将用户带到 Tab3 页面。
前提条件
- 一个预先配置好的 Capacitor 应用。
- 对于 iOS,需注册 Apple Developer Program。
为了说明目的,将使用 https://beerswift.app 作为 Web 应用链接。
使用 Capacitor App API 进行深度链接路由
当点击深度链接后打开原生应用时,移动操作系统不会自动知道将用户路由到哪里。这必须在应用启动时使用 Capacitor App API 在应用内部实现。
如果您的网站和应用路径不匹配,您将需要实现更高级的 URL 模式匹配(参见 本指南 中的示例)。不过,如果您的移动应用和 Web 应用使用相同的代码库,这非常简单——只需重定向到相同的 URL 即可。以下示例基于此假设。
Angular
路由应在 app.component.ts 中实现。首先从 Angular 导入 NgZone 和 Router,然后从 Capacitor 导入 App:
import { Component, NgZone } from '@angular/core';
import { Router } from '@angular/router';
import { Plugins } from '@capacitor/core';
const { App } = Plugins;
接下来,将 Router 和 NgZone 添加到构造函数中:
constructor(private router: Router, private zone: NgZone) {
    this.initializeApp();
}
最后,监听 appUrlOpen 事件,并在找到深度链接时进行重定向:
initializeApp() {
    App.addListener('appUrlOpen', (data: any) => {
        this.zone.run(() => {
            // 示例 url: https://beerswift.app/tabs/tab2
            // slug = /tabs/tab2
            const slug = data.url.split(".app").pop();
            if (slug) {
                this.router.navigateByUrl(slug);
            }
            // 如果不匹配,则不执行任何操作 - 让常规路由
            // 逻辑接管
        });
    });
}
React
React 有多种选择。一种方法是将 App API 监听器功能包装在一个新组件中,然后将其添加到 App.tsx 中。首先创建 AppUrlListener.tsx,然后导入 React Router 的 useHistory hook 以及 Capacitor App API:
import React, { useEffect } from 'react';
import { useHistory } from 'react-router-dom';
import { Plugins } from '@capacitor/core';
const { App: CapApp } = Plugins;
接下来,定义 AppUrlListener 组件,监听 appUrlOpen 事件并在找到深度链接时进行重定向:
const AppUrlListener: React.FC<any> = () => {
  let history = useHistory();
  useEffect(() => {
    CapApp.addListener('appUrlOpen', (data: any) => {
      // 示例 url: https://beerswift.app/tabs/tab2
      // slug = /tabs/tab2
      const slug = data.url.split('.app').pop();
      if (slug) {
        history.push(slug);
      }
      // 如果不匹配,则不执行任何操作 - 让常规路由
      // 逻辑接管
    });
  }, []);

  return null;
};

export default AppUrlListener;
在 App.tsx 中,导入新组件:
import AppUrlListener from './pages/AppUrlListener';
然后将其添加到 IonReactRouter 中(或您的应用引导的任何位置,只需确保 History hook 可用即可):
const App: React.FC = () => {
  return (
    <IonApp>
      <IonReactRouter>
        <AppUrlListener></AppUrlListener>
        <IonRouterOutlet>
          <Route path="/home" component={Home} exact={true} />
          <Route exact path="/" render={() => <Redirect to="/home" />} />
        </IonRouterOutlet>
      </IonReactRouter>
    </IonApp>
  );
};
Vue
VueJS 提供了一个名为 Vue Router 的官方路由系统,可与 Vue 原生集成。要使用 Vue Router 设置深度链接,请从用于配置所有路由的文件开始(通常是 routes.js 或类似文件)。
首先我们从 plugins 导入 capacitor App,以及 Vue 和 VueRouter。
import { Plugins } from '@capacitor/core';
const { App } = Plugins;
import Vue from 'vue';
import VueRouter from 'vue-router';
接下来,使用 Vue Router 配置您的路由(更多信息请参见 Vue Router 入门)。
const router = new VueRouter({
  routes: [],
});
建议使用 mode: history,这样就不需要处理 #。
让 Vue 知道您正在使用 Vue Router,并在 Vue 中注册路由器:
const VueApp = new Vue({
  router,
}).$mount('#app');
最后,我们需要为深度链接注册我们的应用。为此,我们在 Capacitor App 上添加一个 appUrlOpen 事件监听器。Capacitor 会捕获它,然后我们将其交给 Vue Router 导航到请求的页面。
App.addListener('appUrlOpen', function (data) {
  // 示例 url: https://beerswift.app/tabs/tabs2
  // slug = /tabs/tabs2
  const slug = data.url.split('.app').pop();

  // 只有在存在 slug 时才推送到路由
  if (slug) {
    router.push({
      path: slug,
    });
  }
});
创建网站关联文件
为了允许 Apple 和 Google 允许深度链接打开您的应用,必须在您的网站和应用之间建立双向关联。必须为每个平台创建一个文件,并放置在您网站的 .well-known 文件夹中,如下所示:https://beerswift.app/.well-known/。
继续查看 iOS 和 Android 配置详情。
iOS 配置
iOS 配置包括创建网站关联文件和配置原生应用以识别应用域名。
您必须注册 Apple Developer Program。
创建网站关联文件
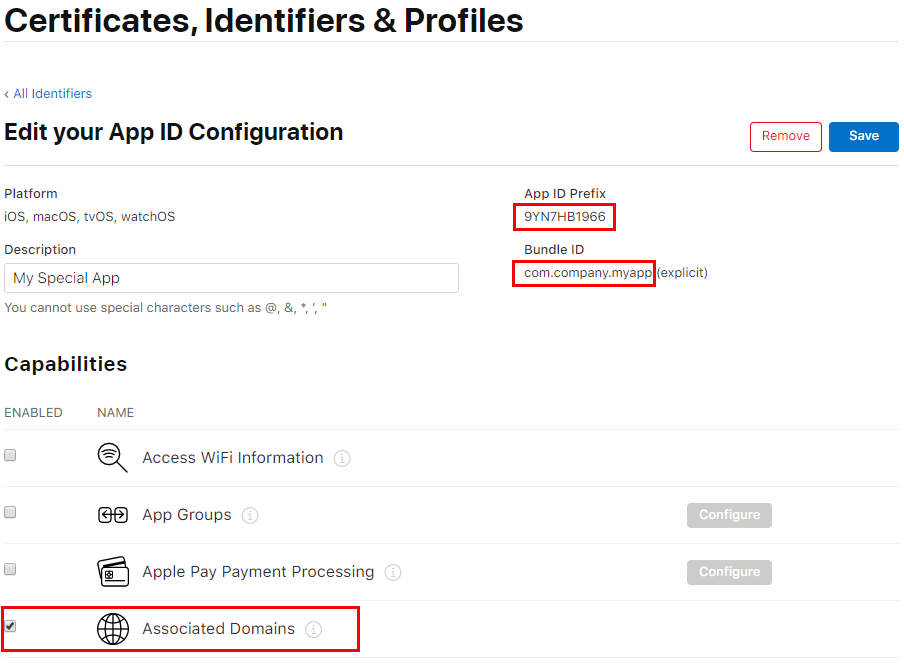
首先,登录 Apple Developer 网站。导航到 "Certificates, Identifiers, & Profiles" 部分,选择您的应用标识符。记下 Team ID 和 Bundle ID,然后在 Capabilities 下,切换 "Associated Domains" 然后保存:
接下来,创建网站关联文件(apple-app-site-association)。
注意:尽管它是 JSON 文件,但不要使用文件扩展名保存。
以下是 apple-app-site-association 文件的示例。请务必将 TEAMID.BUNDLEID 替换为您自己的 ID(例如:8L65AZE66A.com.netkosoft.beerswift)。
{
  "applinks": {
    "apps": [],
    "details": [
      {
        "appID": "TEAMID.BUNDLEID",
        "paths": ["*"]
      }
    ]
  }
}
接下来,将文件上传到您的网站(托管在 HTTPS 上),然后使用 Apple 的工具 在此处 验证其配置是否正确。URL 应遵循此格式:https://beerswift.app/.well-known/apple-app-site-association
添加关联域名
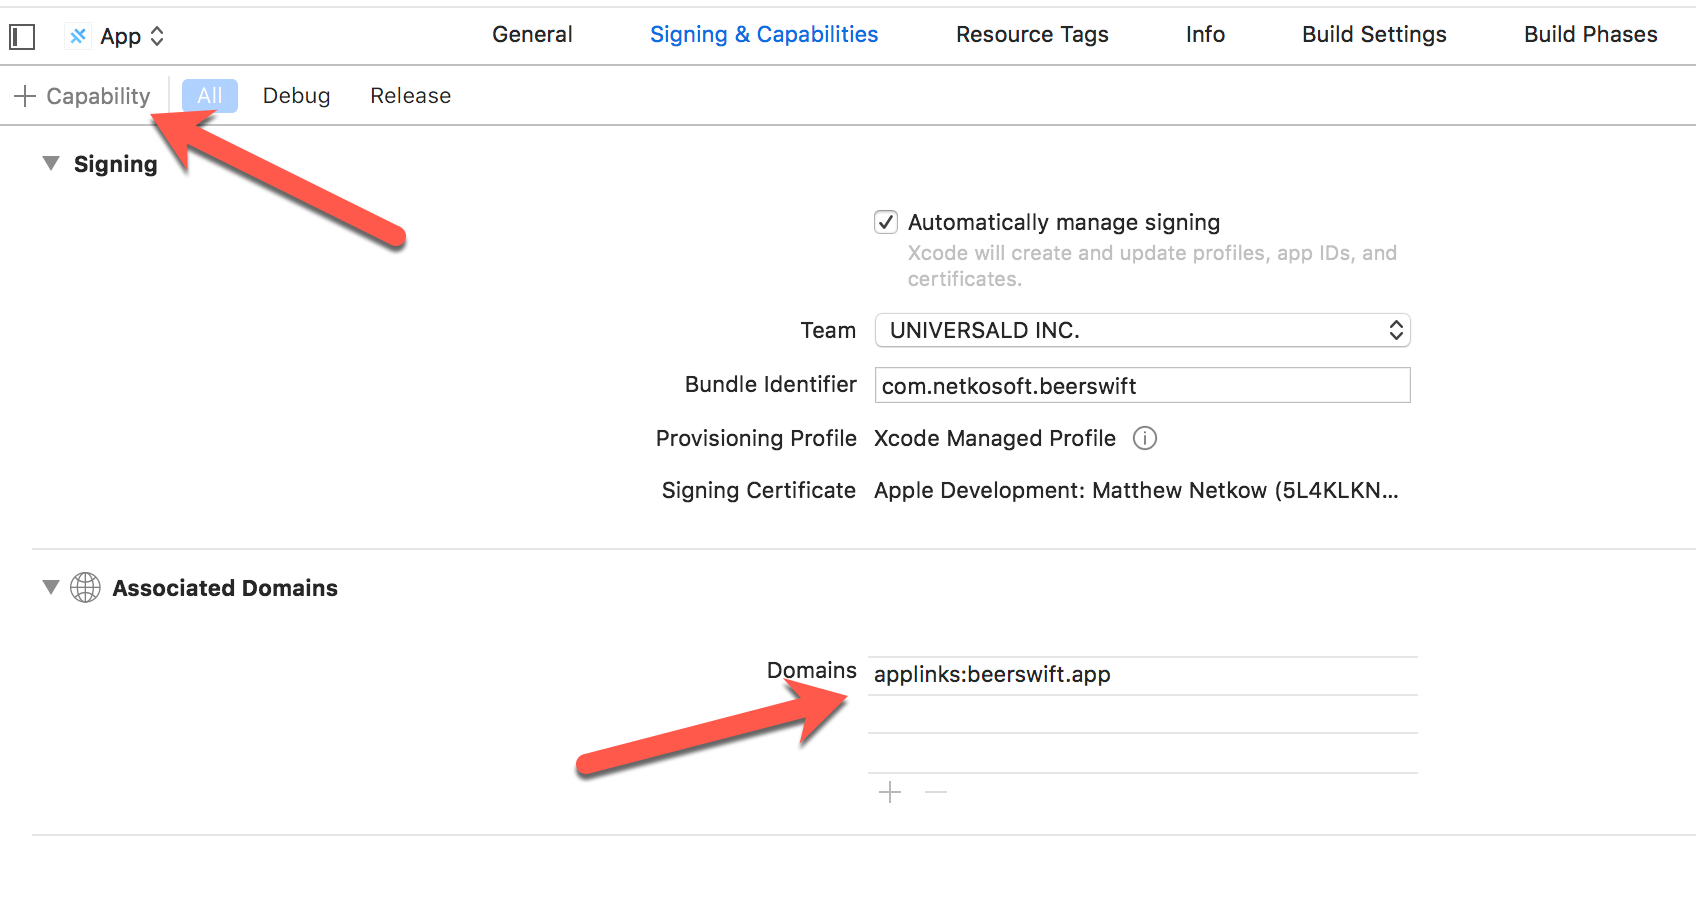
最后一步是配置 iOS 应用以识别传入链接。打开 Xcode,然后导航到 Signing & Capabilities。点击 "+ Capability",然后选择 Associated Domains。在出现的 Domains 条目中,使用格式 applinks:yourdomain.com 进行编辑:
Android 配置
Android 配置包括创建网站关联文件和配置原生应用以使用 intent filter 识别应用链接。
创建网站关联文件
网站关联文件需要您的 Android 证书的 SHA256 指纹。
如果您已在 Google Play Store 中启用自动签名,您可以通过访问 https://play.google.com/console,选择您的应用,然后选择 Setup、App Signing,并复制您的 SHA256 应用签名证书指纹。
如果您尚未签署您的应用或启用自动签名,并且还没有证书,您可以创建一个新证书:
keytool -genkey -v -keystore KEY-NAME.keystore -alias ALIAS -keyalg RSA -keysize 2048 -validity 10000
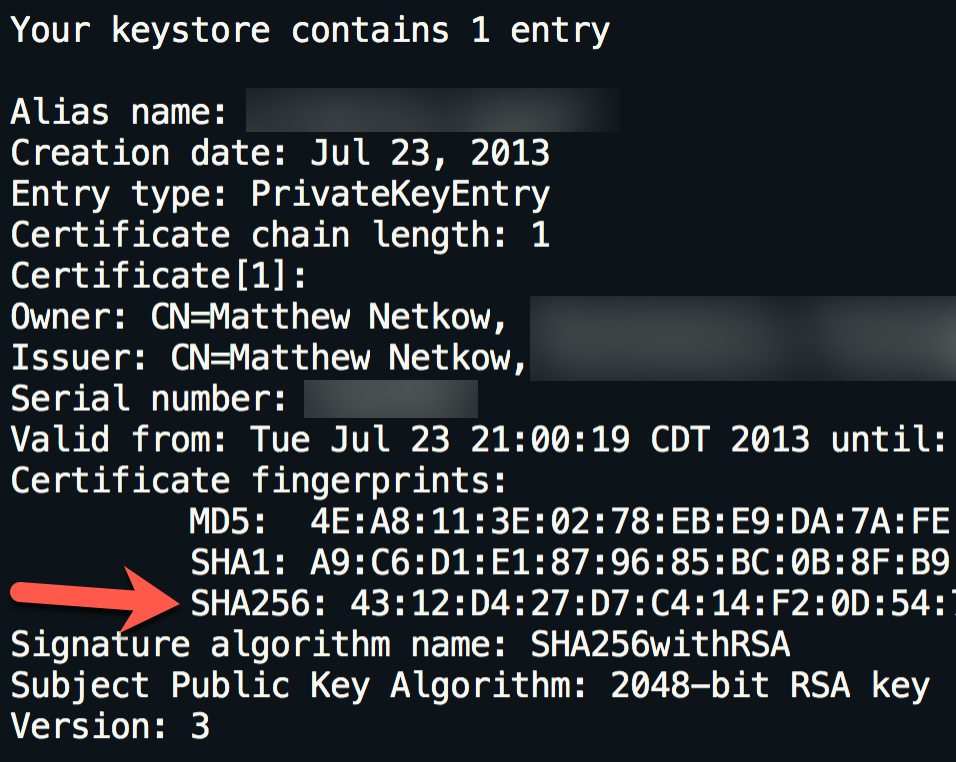
使用您现有的(或新创建的)Keystore 证书,使用 keytool 命令列出密钥库的详细信息:
keytool -list -v -keystore my-release-key.keystore
打印输出将包含 SHA256 指纹:
接下来,使用 Google 的 Asset Links 工具 创建网站关联文件。填写网站域名、应用包名和 SHA256 指纹,然后点击 "Generate statement":
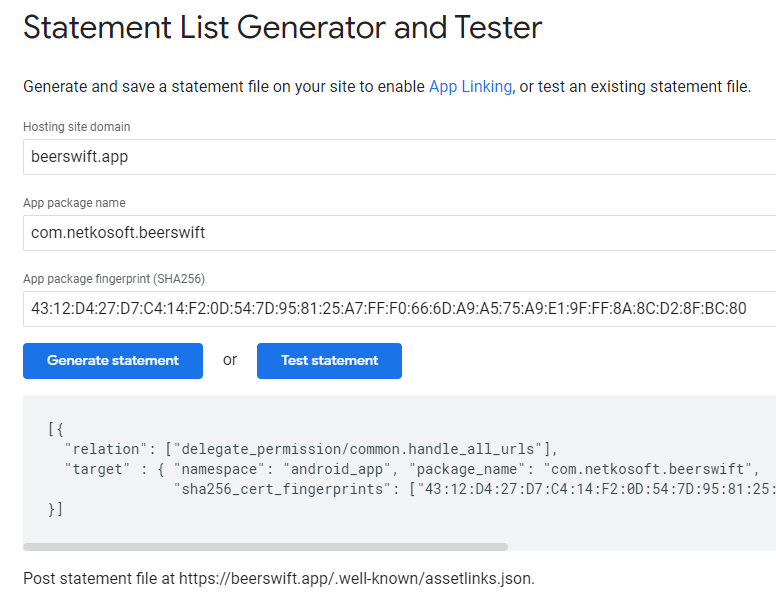
将 JSON 输出复制到 .well-known/assetlinks.json 下的新本地文件中。
// assetlinks.json
[
  {
    "relation": ["delegate_permission/common.handle_all_urls"],
    "target": {
      "namespace": "android_app",
      "package_name": "com.netkosoft.beerswift",
      "sha256_cert_fingerprints": ["43:12:D4:27:D7:C4:14..."]
    }
  }
]
将文件部署到您的网站(托管在 HTTPS 上),然后通过点击 Asset Link 工具中的 "Test statement" 按钮进行验证。如果配置正确,将显示一条成功消息:
成功!主机 [website] 授予应用深度链接到 [app package]。
添加 Intent Filter
最后一步是配置 Android 应用以识别传入链接。为此,请在 AndroidManifest.xml 的 <activity> 元素内 添加一个新的 Intent Filter:
<intent-filter android:autoVerify="true">
    <action android:name="android.intent.action.VIEW" />
    <category android:name="android.intent.category.DEFAULT" />
    <category android:name="android.intent.category.BROWSABLE" />
    <data android:scheme="https" android:host="beerswift.app" />
</intent-filter>
完整的 Activity 应该类似于这样:
<activity
    android:configChanges="orientation|keyboardHidden|keyboard|screenSize|locale"
    android:name="com.netkosoft.beerswift.MainActivity"
    android:label="@string/title_activity_main"
    android:theme="@style/AppTheme.NoActionBarLaunch"
    android:launchMode="singleTask">

    <intent-filter>
        <action android:name="android.intent.action.MAIN" />
        <category android:name="android.intent.category.LAUNCHER" />
    </intent-filter>

    <intent-filter android:autoVerify="true">
        <action android:name="android.intent.action.VIEW" />
        <category android:name="android.intent.category.DEFAULT" />
        <category android:name="android.intent.category.BROWSABLE" />
        <data android:scheme="https" android:host="beerswift.app" />
    </intent-filter>
</activity>
详情:网站配置
网站配置将根据所使用的工具和后端而有所不同。以下是一些建议。
Angular
将关联文件放在 src/.well-known 下。接下来,配置构建过程以保持这些文件原样部署(确保 Apple/Google 可以正确读取它们)。打开 angular.json,在 architect => assets 下,向数组添加一个新条目:
{
  "glob": "**/*",
  "input": "src/.well-known",
  "output": ".well-known/"
}
构建然后部署网站。
NuxtJS
将关联文件放在 static/.well-known 下。无需额外步骤;只需构建然后部署网站。
React
将关联文件放在 public/.well-known 下。无需额外步骤;只需构建然后部署网站。
WordPress
有关 WordPress 的说明,请参见 此处。
验证
要验证网站和原生应用是否正确配置,网站需要托管网站关联文件,但应用不需要在应用商店中。
将设备连接到您的计算机,构建并部署原生应用,然后通过点击网站链接进行测试。如果原生应用打开,则所有步骤都已正确实施。
资源
- Branch.io:什么是深度链接?
- Android:App Links
- iOS:Universal Links
- iOS:启用 Universal Links